How to Compress an Image Without Losing Too Much Quality
A photo straight off a modern phone can be several megabytes. That's too big for many email attachments and upload forms, and it slows down any web page it's placed on. Compressing it can make it dramatically smaller, but push too far and it starts to look blotchy. The goal is to find the point where the file is as small as it can be before anyone notices a difference.
What image compression means
Image compression is any technique that stores the same picture in fewer bytes. Some methods find more efficient ways to write down exactly the same pixels. Others simplify the picture itself in ways that are hard to see. Either way, the file gets smaller.
Why image files get large
- Pixel count: a 12-megapixel photo contains around 12 million pixels, each with its own colour. More pixels means more data.
- Detail and noise: fine textures such as grass, fabric or sensor noise in low light are harder to compress than smooth areas like a clear sky.
- Format: a photo stored losslessly as PNG is usually far larger than the same photo as JPG.
- High quality settings: cameras and phones often save at high quality to preserve detail for editing.
Lossy vs lossless compression
Lossless compression shrinks the file without changing a single pixel, and decompressing it gives back the exact original. PNG is lossless, and WebP has a lossless mode. The savings are real but limited, especially for photos.
Lossy compression goes further by throwing away information the eye is least sensitive to, such as tiny variations in colour and very fine detail. JPG and lossy WebP work this way. They can make photos many times smaller, and at sensible settings the difference is hard to spot. The discarded information can't be recovered, so always keep your original.
Compressing each format
JPG
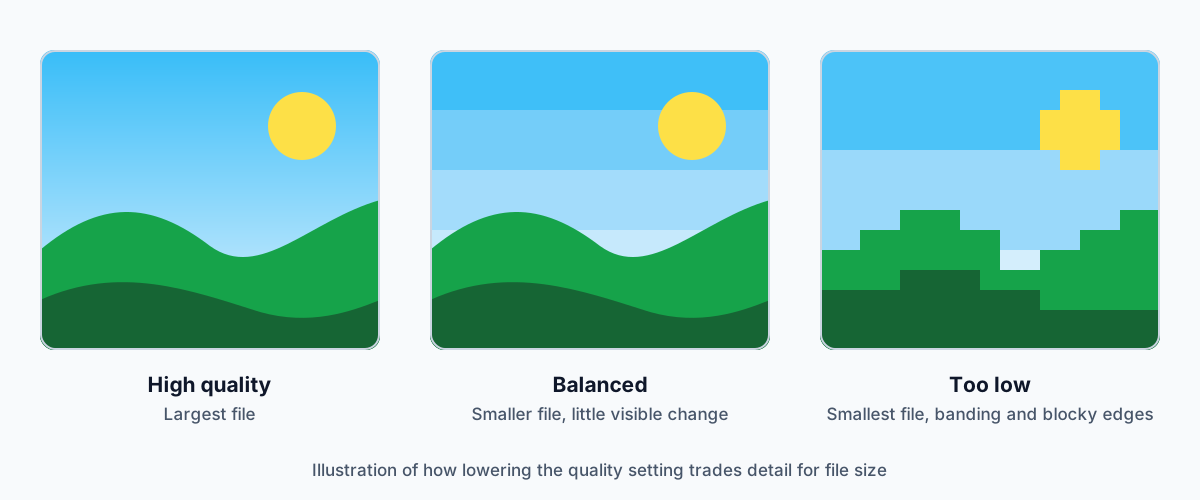
JPG compression is controlled by a quality setting, usually from 0 to 100. The number isn't a percentage of anything specific, and different apps interpret it slightly differently. As a starting point, many photos look essentially the same at around 75 to 85 as at 100, at a fraction of the size. Below that, the first signs of trouble are blocky patches in smooth areas and faint halos around sharp edges.
PNG
Because PNG is lossless, there's no quality slider to turn down. Specialist PNG optimisers reduce files by reducing the number of colours, which is itself a form of lossy compression, or by trying many encoding options. A browser, however, simply re-saves the pixels as they are. That's why re-saving a PNG in a browser-based tool, including ClearCut's, sometimes produces a larger file. For a real reduction, save it as WebP, which keeps transparency, or as JPG if transparency doesn't matter, or reduce its dimensions.
WebP
Lossy WebP also uses a quality setting, and it often reaches a given visual quality with a smaller file than JPG. It supports transparency, which makes it a good way to shrink transparent PNGs for the web. Check that wherever you're sending the image accepts WebP. Our format comparison covers where it's supported.
Quality vs file size
The relationship between quality and file size isn't a straight line. Dropping from 100 to 90 often removes a large chunk of the file with little visible change. Dropping from 60 to 40 saves less and looks noticeably worse. The best settings usually sit somewhere in the middle, and the exact sweet spot depends on the image.
How to choose compression settings
- Start with the right dimensions. If the image will be shown 1200 pixels wide, there's no need to keep 4000. Resizing is often the single biggest saving.
- Pick the right format. Use JPG or WebP for photos. For graphics that need sharp edges or transparency, use PNG or WebP.
- Start around 75% quality for JPG or WebP, and compare the result with the original.
- Adjust in steps. If it looks identical, try lower. If you can see artefacts, go higher.
- Stop when you notice a difference, then step back up a little.
How to check the result
- Compare the two versions side by side at the size they'll really be displayed.
- Zoom in on smooth gradients such as skies, skin and plain walls. Banding and blockiness show up here first.
- Look at sharp edges and text for smudges or halos.
- Check the actual numbers. If the compressed file isn't meaningfully smaller, keep the original.
The Image Compressor shows the original and compressed images side by side, with both file sizes and the percentage change.
Practical examples
A phone photo for an email
A full-resolution phone photo is more than most people need to see in an email. Reduce the longest side to 1600 pixels, keep it as JPG, and set the quality to around 75%. On a normal screen it will look the same, at a much smaller size.
A transparent product cut-out for a website
A PNG from the Background Remover keeps a clean transparent background, but it may be large. Saving it as WebP usually shrinks it while keeping the transparency. Check the edges afterwards.
A screenshot with text
JPG compression smudges text. Keep screenshots as PNG, or use WebP, and reduce the dimensions if they're larger than needed rather than lowering the quality.
You can try all of this in the Image Compressor. It runs in your browser, so your image isn't uploaded. If you need a different format first, use the Image Converter.